Sunday, April 27, 2014

Citrus Marinated Shrimp & Sweet Potato Chips


It was a long, cold winter. Using my big, fancy grill was a distant memory, as it spent several months covered in a deep blanket of snow. I suppose I could have swept the snow off and removed the cover to gain access, but first I would have needed to clear a path to it. It was just too much work when all I wanted to do was hibernate and hide from the chill. But alas good things come to those who wait. Now with spring in the air I can whip the cover off the unimpeded grill in seconds and fire the baby up. It is grill time. 

During the winter I cook slow food that takes a long time for the flavors to develop, but when the weather gets nice I want tasty food on the table fast. I feel energized to make things happen quickly. This recipe fits the bill. While the shrimp marinates for a few minutes the sweet potatoes can be prepared and put in the oven. Right before the sweet potatoes are finished the shrimp goes on the grill. It doesn't take long for it all to come together. 

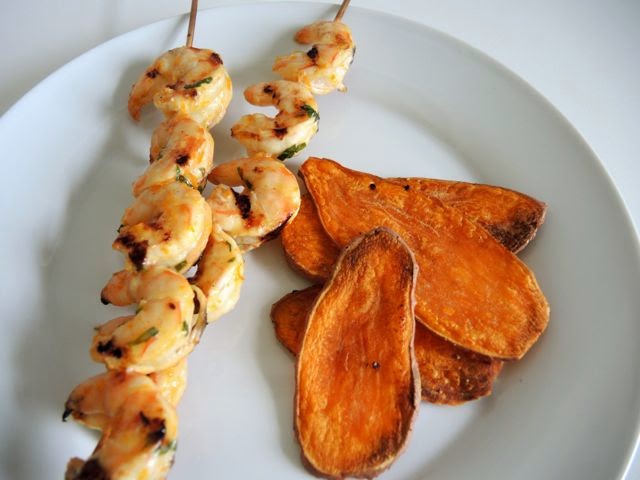
The crisp, sweet potato chips complement the succulent citrus-scented shrimp. A mixed salad or green vegetable would round out the meal nicely. The recipes serve two, but can easily be doubled or tripled just add more shrimp and potatoes. You may need to make a bit more marinate for the shrimp.


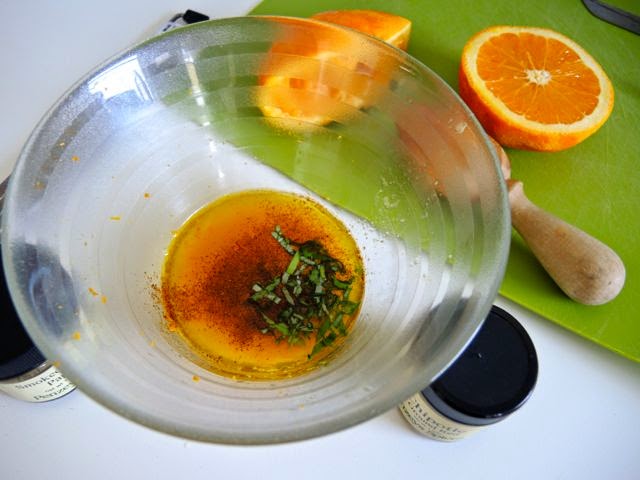
There is a certain someone in my family who will remain nameless who refuses to make a recipe if there are too many ingredients. I'm not sure what the cut-off is, but I'm pretty sure I have gone over the limit here. Let me assure you that the rather lengthy marinate list just adds more complex flavor to the shrimp. If you feel over-whelmed by the number of ingredients, forgo measuring and just add dashes and sprinkles until you reach your breaking point or leave a few ingredients out if you don't have them on hand. Only marinate the shrimp 15-20 minutes so the acid in the orange juice and vinegar don't 'cook' the shrimp. You aren't making Ceviche.


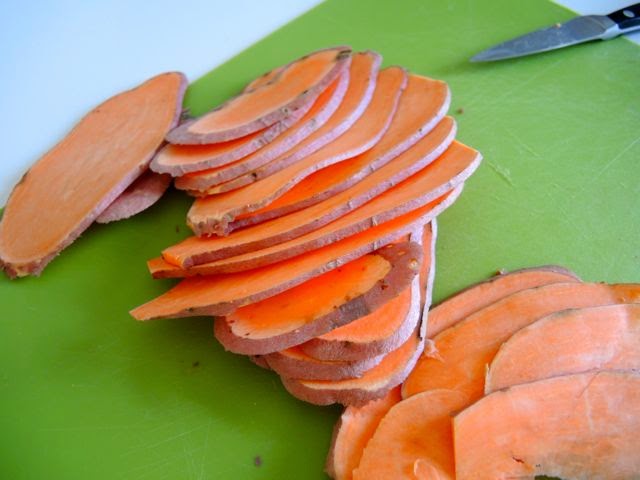
If you have a mandolin slicer use it to make uniformly thin sweet potato slices. They will cook more evenly and help prevent them from burning.


Using coconut oil to coat the potatoes adds a rich, nutty flavor that complements both the potatoes and the shrimp. If you don't have coconut oil, olive oil will work just fine. 


Turn the sweet potatoes over once or twice while cooking so they get crisp on both sides. Watch carefully so they do not burn. I used smoked Spanish paprika and chipotle in both recipes to complement each other. 


 Citrus Marinated Shrimp

1 pound (450 g) raw shrimp, peeled and deveined
zest and juice of one orange
1/2 cup (125 ml) olive oil
1 tablespoon (15 ml) rice vinegar (or other light vinegar)
1 tablespoon (15 ml) soy sauce
1 teaspoon honey
2 cloves garlic, sliced or smashed
1 tablespoon fresh basil, finely chopped
smoked Spanish paprika, to taste
ground chipolte pepper, to taste
wooden bamboo skewers for grilling

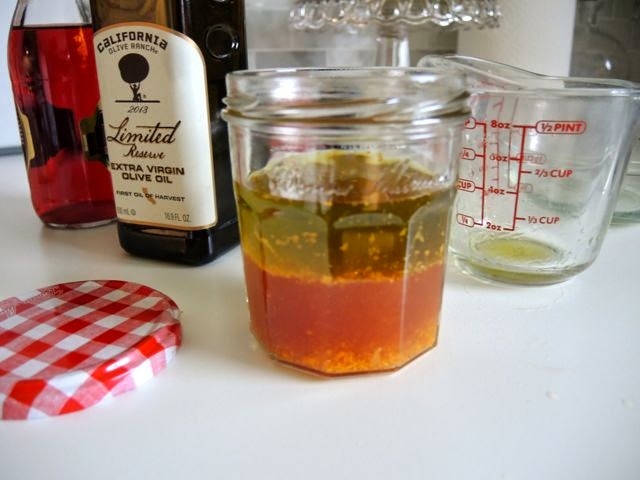
Put wooden bamboo skewers in water to soak. Remove zest from the orange and juice the orange into a glass bowl large enough to hold the shrimp. Add the olive oil, vinegar, soy sauce, honey, garlic, basil, paprika, and chipolte pepper. Whisk to combine. Add the shrimp. Marinate for 15-20 minutes. If the shrimp are very cold they will be fine marinating at room temperature for a short time. Otherwise cover and refrigerate while the shrimp marinates.

Remove the shrimp from the marinate and thread the shrimp onto the bamboo skewers. Discard marinate. Cook on a preheated and oiled grill for 2 minutes per side or until the shrimp are opaque. Take care not to over-cook. Serves 2.

Sweet Potato Chips

2 medium sweet potatoes
1 tablespoon coconut oil or olive oil
smoked Spanish paprika, to taste
ground chipotle, to taste
salt
pepper

Preheat the oven to 350℉ (175℃). Thinly slice the sweet potatoes by hand or with a mandolin slicer. If using coconut oil that is solid put the coconut oil on a pan and put it in the oven for a minute to melt the oil. Remove pan from the oven and toss the sweet potatoes to coat. (If using olive oil sprinkle on the potatoes and toss to coat.) Sprinkle potatoes with paprika, chipotle, salt, and pepper to taste. Roast the potatoes in the oven 15-30 minutes (depending upon the thickness) until crisp. Turn the potatoes over once or twice during baking so they get crisp on both sides. Watch closely so they don't burn. Serves 2.


Wednesday, April 16, 2014

Easter Egg Vanilla-Scented Sugar Cookies


I have a rather large collection of cookie cutters. Way more than I will ever use or even need. Still I am enchanted by them. Every now and then I remove them from the large cookie jar where they live and daydream about what I might create. With spring upon us (I hope) what better way to celebrate new life than with a batch of edible Easter eggs?

Too often decorated cookies look good, but don't have the taste to back them up. Flavored with vanilla-scented sugar, an added punch of vanilla extract, and a little freshly grated nutmeg these sugar cookies are as tasty as they are pretty. Royal icing made with meringue powder elevates plain oval cookies into fanciful eggs. If you want to forgo the royal icing, colored sanding sugar is an easy alternative. Sprinkle the sanding sugar on the cookies before baking. Although decorating these cookies with royal icing is part of the fun and a great kid-friendly activity.

Scrap the seeds from a plump vanilla bean into the sugar. Rub sugar between your fingers to distribute the seeds and scent the sugar.


Rolling out the dough between pieces of waxed or parchment paper before allowing the dough to rest in the refrigerator makes cutting out the cookies a snap.


Freeze the dough briefly before baking so the cookies to have a clean, defined edge.


To decorate the cookies divide the royal icing into separate glass bowls. Add the food coloring a little at a time until you reach the desired intensity. Be sure to keep about one cup of white icing to do the overlay decorations. Thin the colored royal icing with a little water until the consistency of a thick glaze. You want it to be able to spread easily on the cookies. Spoon some icing on each cookie and spread to the edges with a small offset spatula. Allow cookies to dry completely before adding the white decorations.


To add the white decorations put the white royal icing in a pastry bag fitted with a very small round pastry tube. (Alternately, put the icing in a Ziploc bag and seal. Cut the tip off one of the corners to make a small hole. Use as you would a pastry bag.) Don't thin the white icing. You want it to be thick, so it will stand up on the cookies. If it is too runny add more confectioners' sugar until desired consistency.


Allow the royal icing on the cookies to dry. Store the decorated cookies in a tin separating each layer with waxed or parchment paper. The cookies will keep at room temperature for 5 days, (if they last that long).


Easter Egg Vanilla-Scented Sugar Cookies
Inspired by Baking By Flavor by Lisa Yockelson
makes 3 dozen cookies

1 1/2 cups (300 g) granulated sugar
1/2 vanilla bean
3 cups (420 g) unsifted all-purposed flour
1/2 teaspoon baking powder
1/4 teaspoon salt
1/2 teaspoon freshly ground nutmeg
1 cup (8 ounces/226 g) unsalted butter, softened
2 large eggs
2 teaspoons vanilla extract
2 tablespoons (30 ml) milk

To make the vanilla-scented sugar put the granulated sugar in a medium-size bowl. Split the vanilla bean down the middle with a sharp knife. Scrap the seeds out and mix with the sugar using your fingers to work it into the sugar. Set aside.

In another medium-size bowl whisk together the flour, baking powder, salt, and nutmeg.

Put the butter in the bowl of a free-standing mixer fitted with a paddle attachment, cream for 2 minutes on medium speed. Add the sugar and beat another 2 minutes. Mix in eggs, vanilla extract, and milk.

On low speed add the flour in three additions just until the flour is absorbed. Divide the dough into thirds. Roll out each portion between two sheets of waxed or parchment paper until slightly less than a 1/4 inch (6.34 mm) thick. Stack rolled out dough on a rimmed cookie sheet. Cover well with plastic wrap and refrigerate for several hours to over night to allow the dough to rest. Prior to cutting the cookies into shapes freeze the dough for 30 minutes. The cookies will cut out easier and hold their shape when baked.

To bake the cookies preheat the oven to 375℉ (190℃) degrees. Line baking sheets with silicon baking mats or parchment paper. Remove dough from the freezer, peel off waxed or parchment paper from one side then replace it loosely, put that side down on the work surface leaving the paper between the dough and the work surface. Remove the top piece of waxed or parchment paper and cut cookies into desired shapes. Place on prepared baking sheets. Bake for 10-12 minutes until golden. (If baking more than one baking sheet at a time rotate the cookies halfway through to ensure even browning.) Cool cookies for 5 minutes on the baking sheet before transferring to a cooling rake. Allow cookies to cool completely before decorating with royal icing.


Royal Icing
makes 2 1/2 cups

16 ounces (545 g) confectioners' sugar, sifted
5 tablespoons meringue powder
2 teaspoons freshly squeezed lemon juice
2 teaspoons vanilla extract
1/3 cup (79 ml) water

Combine all ingredients in the bowl of a freestanding mixer with a paddle attachment. Mix on low speed until the ingredients are combined. Scrape down the sides of the bowl then beat for 2-4 minutes longer until the icing is glossy and smooth but not fluffy. You may need to add additional water if the icing is too stiff. Add a little at a time. If you add too much add additional confectioners' sugar to thicken. Royal icing dries quickly. Keep the bowls covered with plastic wrap or a damp towel when not using. Store any left-over icing in the refrigerator in a glass jar.

To decorate the cookies divide the royal icing into small glass bowls. Color the icing with food coloring. Add a little color at a time until you reach the desired intensity. (Be sure to reserve about one cup of white icing to do the overlay decorations.) Thin the colored royal icing with a little water until the consistency of a thick glaze. You want it to be able to spread easily on the cookies. Spoon some icing on each cookie and spread to the edges with a small offset spatula. Allow cookies to dry completely before adding the white decorations.

To add the white decorations put the white royal icing in a pastry bag fitted with a very small round tube. (Alternately, put the icing in a Ziploc bag and seal. Cut the tip off one of the corners to make a small hole. Use as you would a pastry bag.) Don't thin the white icing. You want it to be thick so it will stand up on the cookies. If it is too runny add more confectioners' sugar until desired consistency.

Allow the royal icing on the cookies to dry. Store the decorated cookies in a tin separating each layer with waxed or parchment paper. The cookies will keep at room temperature for 5 days, (if they last that long).


Sunday, April 6, 2014

Roast Green Vegetable Salad with Orange Vinaigrette


Eat your vegetables. How often have you heard that in your life-time? As spring turns the outside green again I feel the need to eat green vegetables as well. Asparagus, broccolini, sugar snap peas, and green beans make a healthy salad. Toss in some nuts and it becomes quite hardy. This salad makes eating your vegetables easy thanks in part to the burst of flavor the orange vinaigrette adds.

I like making things easy, so if I am going to turn the oven on to toast the nuts I figure why not just roast the vegetables, too. However, you can blanch the vegetables in boiling water if you prefer. The salad tastes great either way. I just prefer the added intensity roasting gives. If you do choose to cook the vegetables in boiling water, 'shock' them in cold water afterwards to stop the cooking process, so they retain their bright green color.


I used hazelnuts for this recipe because I love the taste and the crunch they add, but any nut will do. Pistachios, cashews or almonds would be fine substitutes. Just make sure to toast them first to bring out the nutty flavor.


I roasted the broccolini whole because it looked so pretty I didn't want to cut it first. But it will roast faster if cut, so do cut before roasting. If you use broccoli instead of broccolini remove the stalks and cut into florets.


My mother taught me a clever way to make sure you never get a 'woody' end of asparagus. If you hold a piece of asparagus in both hands and snap off the end it will break where the asparagus is tender. You may lose a little more of the asparagus than you would have if you cut the ends off and it takes a little more prep time, but you will never bite into a woody stalk again. Which is a sacrifice I think worth making.


Freshly grated orange zest and juice give the vinaigrette a nice bright flavor. Be sure to use good quality vinegar and olive oil. My dear friend Sally gave me a lovely bottle of California Olive Ranch Limited Reserve Extra Virgin Olive Oil. It is so rich and flavorful I could drink the stuff. The peppery flavor really gives the salad a boost.


Make sure to dress the salad just before serving, as the vinaigrette will cause the vegetables to lose their bright green color if left to sit for too long.


Roast Green Vegetable Salad with Orange Vinaigrette

1 pound (16 ounces/450 g) asparagus, ends removed and cut into bite-size pieces
8 ounces (226 g) broccolini or broccoli, ends removed and cut into bite-size pieces or florets 
8 ounces (226 g) sugar snap peas, stemmed, strings removed
8 ounces (226 g) green beans, stemmed, broken in half or left whole depending upon size
1/2 cup (66 g) chopped hazelnuts
extra virgin olive oil for roasting

Orange Vinaigrette

1/2 cup (120 ml) extra virgin olive oil
1/4 cup (60 ml) red wine vinegar
zest and juice from one orange
1 teaspoon finely minced shallots
coarse salt and freshly ground pepper 

Preheat the oven to 350℉ (180℃). Place chopped hazelnuts on a rimmed baking sheet. Toast in the oven until lightly browned about 8-10 minutes. Watch closely so they do not burn. Remove from the oven and transfer to a bowl to cool. 

Toss vegetables with some olive oil and put on rimmed baking sheets. Roast in the oven until tender but still bright green, about 10-15 minutes. A knife should pierce the flesh easily. Roast the asparagus and broccolini or broccoli on separate trays because their roasting time may vary. The sugar snap peas and green beans can be roasted together on the same baking sheet. Rotate the pans a few times to ensure even roasting.

While the vegetables are in the oven make the vinaigrette. Combine shallots, orange juice and zest, red wine vinegar, salt, pepper and olive oil in a jar with a tight-closing lid. Shake vigorously to emulsify. Set aside.

When the vegetables are done roasting allow them to cool for a few minutes then put them in a large bowl. Sprinkle the toasted hazelnuts on top. When ready to serve shake vinaigrette again to emulsify and toss with vegetables. You may not need all the vinaigrette. Start with half, then add more if desired. Serve immediately. The salad can be served slightly warm or at room temperature. Do not dress the salad until ready to serve as the vegetables will loss their bright green color. 
Serves 6-8.